Laser printers use the same printing process as photocopiers. The difference between a laser printer and a photocopier is in the way the image is created prior to printing. In a photocopier the page to be copied is scanned using a very bright light, and the light reflected from the white or light-coloured areas on the page is used to discharge a photoreceptor. The photoreceptor is a surface, either a drum or a belt, which can be electrostatically charged, and then discharged by exposure to light. The reflected light in a photocopier discharges the photoreceptor for the white areas of the page, leaving the photoreceptor charged only where there are black areas on the page, and so creates an electrostatic image of the page to be copied. In a laser printer, light from a laser beam is used to discharge areas of the photoreceptor to create an electrostatic image of the page to be printed. Printers which create the image by using the laser to discharge the background areas which are not to be printed are referred to a "write-white", printers which create the image by using the laser to discharge the areas which will be printed are called "write-black". As light-lens photocopiers are "write-white", most early laser printers were also write-white, but most printers are now write-black, as write-black printers are generally better at printing very fine lines. The image is created by the printer controller, a dedicated computer in the printer, and is passed to the print engine which controls the laser and performs all the mechanical actions of making a print.
The printer controller is a dedicated computer which creates an image from commands it receives from the host computer sending the document. A controller has to perform several tasks, including communication (talking to the host computer), interpretation (finding and understanding the commands sent to it, which are normally embedded in the data to be printed), formatting (preparing to create an image, including setting the paper size, margins, selecting fonts etc.), rasterising (rasterising is the creation of the image as an array of dots ready for the laser), and finally passing the image to the print engine. Different printer languages make different demands on the controller, and different manufacturers use different approaches to the design of controllers, so each make and model of printer controller operates in a slightly different way, but each has the same effect. The following paragraphs describe the generic functions performed by printer controllers to format a document for printing.
The communications function of a printer controller "talks" to the computer which is sending the document to be printed. It receives data from the computer through a communications port, and tells the computer when to stop sending data so that it can process the data it has received, and when to start sending data again (this process is known as handshaking, there are many different handshaking protocols, the protocol used depends on the type of computer and communications port used). Many office and workgroup printers have several ports, allowing simultaneous connection to several computers, in which case the communications function has to talk to all of them concurrently without mixing up which data comes from which computer, or ask the other computers to wait while it processes the current job.
As it receives the data from the computer the communications function either passes the data directly to the interpreter, or stores it in a queue. The queuing system is known as Job Spooling, and is common on large workgroup and production printers. The incoming data is stored, normally on a hard disk built into the printer, and can be held until the printer operator activates it for printing. On production printers this is the normal way of working, as the computer can then send data at any time, and the printer operator doesn't have to print it until he or she is ready. On workgroup printers the normal way of working is for the data to be put in the job spool and held until the interpreter is ready (when it has finished printing the current job), at which point the job is automatically printed. The main value of this feature is when several users are sharing a printer, as they can all send their print jobs at the same time, and the printer will store them in the job spool until it's ready to print. A secondary feature of the job spool is in printing multiple copies of a document. The print job only needs to be sent to the printer once to store it in the job spool, but it can be printed several times from the job spool, which reduces the amount of time the computer needs to spend sending the data to the printer.
The interpretation function of the controller, normally called the interpreter, examines the data sent from the computer and identifies the command embedded in the data. The commands will fall into several categories, such as printer control, page format, font management, text layout and graphics, and must be arranged and submitted to the formatter in the correct order and priority, incorrect or invalid commands must also be processed and signalled to the user. The interpreter is usually responsible for implementing the printer control commands, these are commands which perform generic operations such as selecting duplex or simplex, manual feed, and other commands which have no impact on the formatting of the page. In some printers this is all that the interpreter does, in other printers the interpreter may also translate the commands into a shorthand or "tokenised" form which the formatter can process more efficiently. The interpreter passes the structured print data to the formatter.
The formatting function of the controller, called the formatter, takes the structured print data and arranges the page. The first priority is normally to set the paper size, and then the margins, until these are set the line length is unknown. When the line length is set the formatter can arrange the text. Some computer programs send all the commands required to position the text on the page, specifying exactly where each character is placed so that the formatter has very little to do, other programs send the minimum of commands, and expect the printer to work out the details. If, for instance, the formatter receives a command to justify the text between the margins, it must, using the font width information for each letter, space out and calculate the exact position of each letter in the line so that the end of the line of text is both the end of a word, and exactly flush with the right margin. If the font requested by a command is not available in the printer, the formatter must choose a substitute and use that instead. Once the formatter has determined how much can be fitted on the line, it inserts a new line command to start the next line. The formatter lays out the text until it has reached the bottom of the page, or the end of the data. The formatter will also process any graphics on the page, converting vector graphics command to bitmaps and checking the validity of any bitmap graphics sent to the printer. When the complete page is formatted, the formatter passes it, as a very detailed set of commands specifying the font and position of each letter and the position of each bitmap graphic, to the rasteriser.
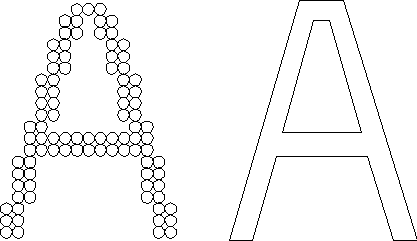
Printer fonts come in two varieties, bitmap and outline. A bitmap font is one where each letter is stored as a pattern of dots, ready for printing. An outline font is stored as a set of equations defining the lines which make the boundary of each letter. When an outline font is used the equations must be used to draw an outline of the required letter, which is then filled with dots to make the bitmap. As equations, outline fonts can be scaled to any size and rotated to any angle. Bitmap fonts cannot be scaled, and can normally only be rotated through 90° intervals. Converting outlines to bitmaps requires significant processing power, so outline fonts are normally found on more powerful printers. The outlines are converted to bitmaps immediately before the data is passed to the rasteriser, and the bitmaps are stored in a temporary storage area called the font cache.
Picture of the letter "A" in bitmap form (left) and outline form (right).
The rasteriser is the final stage in the process of preparing an image for printing, and converts the commands received from the formatter into an array of dots to be used by the laser. It takes the bitmap for each character of text, and places it at the specified position in the array, then overlays the array with any bitmap graphics, to form the pattern to be printed. As the array of dots for a full page can be very large, there are alternate methods for constructing the array; it can be made as a Page Buffer, or several Band Buffers. Once the array is ready it is passed to the print engine, where the laser writes it onto the photoreceptor.
The page buffer is an array of dots sufficient to cover the whole page, each dot on a monochrome printer is 1 binary digit. This technique is the easiest to program, but it requires lots of memory. For an A4 image at 300 d.p.i the memory required is about 1 megabyte (((11.66 x 8.27) x 300²) / 8), at 600 d.p.i this goes up to 4 MB (((11.66 x 8.27) x 600²) / 8). The memory required can be significantly reduced using compression techniques, but it is still a lot, and some printers have two page buffers so that one page can be sent to the laser while the next page is being rasterised. Some duplex printers have several page buffers so that they can queue pages in the paper turning mechanism, and colour printers require a page buffer for each colour, so they need four times as much memory as a monochrome printer.
The alternative to the page buffer technique is the band buffer. In the band buffer technique the page is divided into several horizontal strips or bands. The rasteriser builds a band, then builds the next band while the first band is sent to the laser. When the first band has been sent to the laser the second band is sent to the laser, while the memory used for the first band is reused for the third band, then the second band is reused for the fourth band, and so on. This technique requires much less memory than the page buffer, and is therefore much cheaper. Two bands, each 64 dots high and 8.5 inches wide at 300 d.p.i, would require about 40 KB.
The band buffer technique is normally used on small, inexpensive printers, and on older printers designed when memory was very costly. It is much more difficult to design the software for a band buffer printer, and band buffers are impractical when printing complex pages with large characters and complicated graphics.
The print engine is the mechanical mechanism which transcribes the array of dots created by the printer controller into a printed image. The print engine incorporates a small computer to control the motors and electrical circuits, but nothing on the scale of the printer controller. On small printers the printer controller is normally housed within the casing of the print engine, but on many large production printers it occupies a separate box, and may also include a screen and keyboard for the operator.
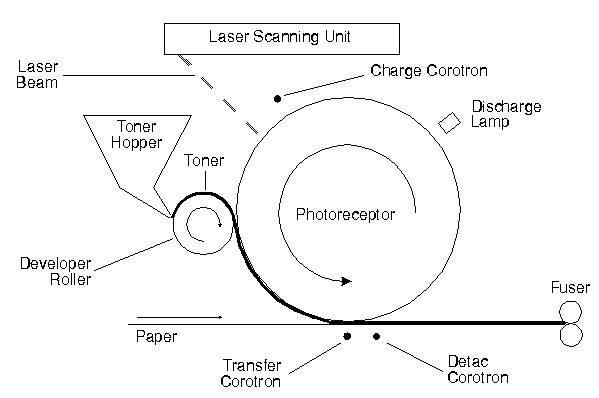
The print engine includes the following major components: laser scanning assembly, photoreceptor, toner hopper, developer unit, corotrons, discharge lamp, fuser, paper transport, paper input feeders and paper output trays. The paper path and the manual feed facility are also important considerations.
Picture of a typical Print Engine.
The laser scanning assembly, sometimes called a Raster Output Scanner (ROS), comprises the laser, a rotating mirror, and a lens. The laser emits a very brief pulse of light for each dot to be printed, and no pulse for blank areas (or vice versa in a write-white printer). The mirror deflects the laser beam in the horizontal axis to position the dot along a line, and the lens corrects the positioning of the beam to counteract the divergent effect caused by the edges of the photoreceptor being further from the mirror than the centre. The action of the laser and the mirror are carefully synchronised so that each pulse of laser light is one dot wide, and each successive pulse or no pulse is one dot further along the line than the previous one. The mirror only deflects the laser in one axis, movement in the other axis is achieved by moving the photoreceptor.
The photoreceptor is normally a cylinder, or drum. Some printers and copiers use a continuous belt instead of a drum, but the principle of operation is the same. The photoreceptor has a very smooth surface which can accept an electrostatic charge, and is discharged by light. Before exposure to the laser beam the photoreceptor is charged evenly all over by the charger corotron. Where the laser beam places a spot of light on the photoreceptor it is discharged, to create a pattern of discharged dots. The photoreceptor revolves slowly and continuously, and the laser is carefully synchronised so that each horizontal line of dots produced by the laser is one dot below the previous line (although the photoreceptor revolves continuously, the dots still appear to be in a straight line because the laser scans across the photoreceptor very, very fast so any distortion is very small). In this way a pattern of charged dots is assembled on the photoreceptor.
As the photoreceptor revolves it passes the developer unit, where in a write-black printer the discharged charged dots on the photoreceptor attract toner from a charged developer unit (in a write-white printer the charged areas attract toner from an uncharged developer unit), to form a pattern of toner in the image of the electrostatic charge modified by the laser.
The photoreceptor continues revolving, and as it does, it comes very close to the paper, which is moving at the same speed and direction as the photoreceptor. Underneath the paper is the transfer corotron (a corotron is a wire connected to a very high voltage to create an electric field). The corotron charges the paper, which then attracts the toner from photoreceptor to form a pattern of toner on the paper in the image of the electrostatic charge written by the laser.
The final phase in the cycle of the photoreceptor is to pass the discharge lamp. This exposes the whole width of the photoreceptor to light to erase the residual electrostatic charge before the photoreceptor completes its' revolution and meets the charger corotron for the next cycle.
The toner hopper exists to hold toner. It may be built into the same casing as the photoreceptor (in which case the assembly is called a print cartridge), or it may be separate. Toner is a very fine powder, black or coloured, made of plastic granules which are attracted to an electrostatic charge. It is the toner which actually forms the image on the paper. The toner hopper feeds toner into the developer unit.
The developer unit consists of a magnetic roller, covered in fine magnetic particles, "developer" (similar to iron filings, but much finer). The magnetic particles act as a very fine "brush". As the roller rotates, it passes the toner hopper and the brush effect of the developer gathers a smooth coating of toner particles. The roller also passes the photoreceptor, and as the toner particles are attracted to the electrostatic charge on the photoreceptor, they jump on to the charged areas of the photoreceptor surface to create a pattern in the image of the electrostatic charge produced by the laser.
There are several corotrons in a laser printer, primarily the charge corotron, the transfer corotron, and the detac corotron. A corotron is normally a wire carrying a very high voltage. The high voltage in the wire creates an intense electric field around the wire causing the surrounding air to ionise, resulting in the application of an electrostatic charge to a surface. As the electric field ionises the air around the wire, it creates ozone, which is an aggressive and corrosive gas, so some modern small printers use charged rollers instead of corotrons. Charged rollers cause minimal ionisation and ozone production, and are therefore environmentally more friendly and create less odour, but apply an electrostatic charge to a surface in the same way as a corotron.
The charger corotron charges the surface of the photoreceptor before it reaches the laser beam, to ensure a smooth, even charge over all the photoreceptor surface.
The transfer corotron electrostatically charges the paper so that it attracts the toner from the photoreceptor on to the surface of the paper.
Once the paper has passed the photoreceptor and attracted the toner, the detac corotron cancels the charge on the paper to prevent it from sticking to the photoreceptor or other sheets of paper (electrostatically charged paper is very difficult to handle, as the sheets stick together with the electrostatic charge).
Once the photoreceptor has passed the paper and lost its' coating of toner, the discharge lamp exposes the whole width of the photoreceptor to light to remove the pattern of the image written by the laser. The discharge lamp on most modern small laser printers it is actually a line of L.E.Ds (light emitting diodes), which are much more reliable than an electric bulb.
The final stage in the printing process is to fix the toner onto the paper. As the toner is a very fine plastic powder, once transferred from the photoreceptor it lies on the paper in a very thin coating, with nothing to hold it in place. It can easily be brushed off, or even blown off, the paper, destroying the image that has been created. In order to fix the toner to the paper permanently, it is heated, normally by passing between a pair of very hot rollers, so that the plastic melts around the fibres of the paper and is "fused" into place. Once the image has been fused the printing process is complete.
The paper transport mechanism is the mechanical heart of a laser printer. The paper transport moves the paper through the printer by feeding it between motorised rollers. As the movement of the photoreceptor, developer roller, and paper must be synchronised, the paper transport mechanism is normally responsible for the movement of the photoreceptor and developer roller, which are connected to the paper transport by gears or toothed belts.
Picture of a typical Paper Transport Mechanism
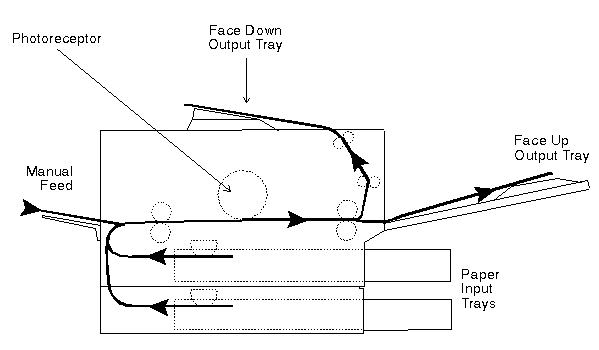
The paper input feeders exist to hold paper. Paper input feeders on office printers use trays of paper (paper trays, some times called cassettes) which are usually of a fixed size, and may hold between 100 and 250 sheets of paper. Some personal printers have adjustable trays as standard, and most large production printers have adjustable feeders which do not use a tray. Production printers need to hold large quantities of paper, usually around 2,500 sheets per feeder, so to ensure that the paper is always at the top of the feeder ready for the paper transport, high capacity paper feeders include a motorised elevator mechanism which lifts the paper up to the required height. This technique is also used by the high capacity feeders available for some workgroup printers.
A printer may have several paper input feeders, some models allow up to five trays to be loaded into the printer. Where a printer has multiple feeders, each tray can be loaded with a different type of paper, such as pre-printed headed paper, or several sizes of paper. The printer will obey commands from the computer specifying which tray, or which paper size, to use.
The paper output trays receive the printed paper. Some printers have several output trays, selectable by command, allowing the separation of different print jobs, however the majority of printers only provide two output trays, one "face up" and one "face down".
The face up tray receives paper delivered printed side up, with the result that multi-page documents are received in reverse order, as page two lies on top of page one. For this reason most printers are designed so that the face up output tray is an auxiliary output tray used for card, transparencies, and other media normally fed through the manual feed facility. As an auxiliary tray, most face up trays will only hold a small amount of output.
The face down tray receives paper face down, so that multi-page documents are delivered in the correct order, with page two behind page one. As this is the order in which documents are required, the face down tray is used as the main output tray for normal printing, and should be able to hold a large amount of printed output. Most laser printer manufacturers try to design their face down trays to hold as least as much paper as the input trays, to maximise the amount of time the printer can be left unsupervised.
On printers with many input trays, or high capacity feeders, the main paper output tray sometimes includes a motorised elevator mechanism which lowers the output tray as paper is added to it, to allow it to hold a large stack of paper. These printers normally also offer a job offset facility, which offsets print jobs in the output tray to simplify the separation of individual print jobs.
Paper Trays and Paper Path on a Typical Desktop Printer
The paper path is not a physical component of a printer, but describes the path taken by the paper as it is fed through the printer. In order to achieve a compact footprint, most printers have several bends in the paper path. Bends in the paper path represent a difficulty, as the paper is most likely to fold and jam in the printer mechanism where it is required to pass through a bend, and the smaller the radius of the bend, the more likely it is to cause paper jams. The stiffer the paper or card being used, the more likely it is to resist bending, and the more chance of a jam occurring. In order to overcome this problem, most small printers provide a manual feed facility which bypasses some of the bends in the paper path. In many printers it is possible, by using the combination of manual feed input and face-up tray output, to avoid bends altogether. This gives a straight paper path for feeding difficult materials which would otherwise jam in the printer.
The manual feed facility provided by small printers allows the user to insert difficult media (card, labels transparencies etc.) one sheet at a time, thus enabling printing on materials which might otherwise jam in the printer. The manual feed facility normally bypasses any bends between the paper input feeder and the photoreceptor.
In addition to permitting the use of difficult materials the manual feed facility, as it does not have a fixed-size paper tray, will allow the use of odd sizes of media which do not fit in standard paper trays.
The manual feed facility is normally used in conjunction with the face up (auxiliary) paper output tray, on most small printers this combination eliminates all bends in the paper path.